.. Author: Bu Kun .. Title: Map with two layers
Static map with two layers
==========================
View examples
-------------
.. raw:: html
 .. raw:: html
In this example, the image is generated to the source of the URL
connection ``
.. raw:: html
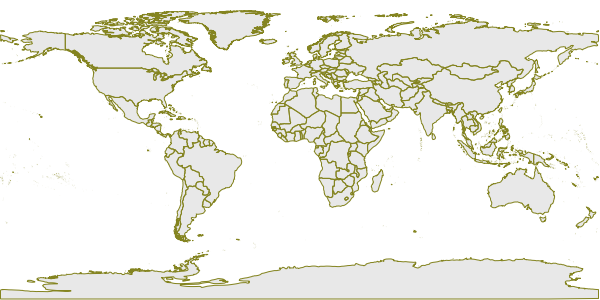
In this example, the image is generated to the source of the URL
connection ``![]() `` Label:
::
http://webgis.pub/cgi-bin/mapserv?map=/owg/mfa2.map&layer=world-country&layer=country-line&mode=map
Most traditional MapServer examples are shown in this way.
This example is slightly different from the previous one, where the
color of the polygon has been modified.
Mapfile description
-------------------
First take a look at the MapFile that this example uses ``mfa2.map`` ),
This Mapfile defines two layers:
.. literalinclude:: ./mfa2.map
:lineno-start: 1
It’s important to remember that MapServer’s render layers are in the
order they are specified in the mapfile. The last layer in the Mapfile
is the top layer of the map rendering result, building the map on top of
all the previous layers. This means that details shown earlier in the
Mapfile (ie, lower layers in the map image) may be obscured. This is
most important when rendering polygon layers, since polygons can be
filled with a specified color. If the map server renders a point layer
(that is, for example, the location of a city), then the render state
represents a polygon layer, and the city will not be visible unless the
specified polygon layer color is transparent.
This problem is easily remedied by defining the polygon layer in front.
Polygons can also be rendered as a series of lines (ie, a line layer).
Since a line is one-dimensional, there is no area to fill, so the
details of the layers below are still visible. When there is no fill
color, the specified color is: ``-1,-1,-1``, which can also achieve the
effect of transparency.
The structure of MapFile looks like this:
::
MAP
LAYER
CLASS
STYLE
LAYER
CLASS
STYLE
Compared to the previous Mapfile, the changes are as follows:
.. literalinclude:: ./xx_diff_mfa2_mfa1.htmp
:lineno-start: 1
Here, the original layer is divided into two layers. The first layer is
still a polygon layer, but there is no ``OUTLINECOLOR`` attribute in the
style anymore. The ``TYPE`` of the second layer is ``LINE`` and the
color value is different from the ``OUTLINECOLOR`` in the first example.
This produces a slightly different image from the first example.
Further explanation
-------------------
Here is an explanation of why this is done. If we continue to add layers
on top of the state layer, the contours are most likely to be masked by
these layers. To be able to see the borders and add other layers, we
have to separate the borders layer from the state polygon layer and
place it on top of the other other layers. There is an order in how to
define/add layers, which will be explained later. Here you just need to
remember according to “Later on top” (layers defined later will be
displayed on the top).
`` Label:
::
http://webgis.pub/cgi-bin/mapserv?map=/owg/mfa2.map&layer=world-country&layer=country-line&mode=map
Most traditional MapServer examples are shown in this way.
This example is slightly different from the previous one, where the
color of the polygon has been modified.
Mapfile description
-------------------
First take a look at the MapFile that this example uses ``mfa2.map`` ),
This Mapfile defines two layers:
.. literalinclude:: ./mfa2.map
:lineno-start: 1
It’s important to remember that MapServer’s render layers are in the
order they are specified in the mapfile. The last layer in the Mapfile
is the top layer of the map rendering result, building the map on top of
all the previous layers. This means that details shown earlier in the
Mapfile (ie, lower layers in the map image) may be obscured. This is
most important when rendering polygon layers, since polygons can be
filled with a specified color. If the map server renders a point layer
(that is, for example, the location of a city), then the render state
represents a polygon layer, and the city will not be visible unless the
specified polygon layer color is transparent.
This problem is easily remedied by defining the polygon layer in front.
Polygons can also be rendered as a series of lines (ie, a line layer).
Since a line is one-dimensional, there is no area to fill, so the
details of the layers below are still visible. When there is no fill
color, the specified color is: ``-1,-1,-1``, which can also achieve the
effect of transparency.
The structure of MapFile looks like this:
::
MAP
LAYER
CLASS
STYLE
LAYER
CLASS
STYLE
Compared to the previous Mapfile, the changes are as follows:
.. literalinclude:: ./xx_diff_mfa2_mfa1.htmp
:lineno-start: 1
Here, the original layer is divided into two layers. The first layer is
still a polygon layer, but there is no ``OUTLINECOLOR`` attribute in the
style anymore. The ``TYPE`` of the second layer is ``LINE`` and the
color value is different from the ``OUTLINECOLOR`` in the first example.
This produces a slightly different image from the first example.
Further explanation
-------------------
Here is an explanation of why this is done. If we continue to add layers
on top of the state layer, the contours are most likely to be masked by
these layers. To be able to see the borders and add other layers, we
have to separate the borders layer from the state polygon layer and
place it on top of the other other layers. There is an order in how to
define/add layers, which will be explained later. Here you just need to
remember according to “Later on top” (layers defined later will be
displayed on the top).